
Using ADF Utilities for building ADF ARM Templates
Updated:
Azure Data Factory portal is the tool for authoring and publishing ADF artifacts, that is pipelines, data sets, linked services, etc. And whilst the portal allows you to integrate with Git code repos for source control, you are still required to validate and then publish the code manually to a live instance of ADF to generate deployment ARM templates.
In this series of posts, I will use ADF Utilities for validating and building ADF ARM templates. The ARM templates can then be used to deploy the ADF solution artifacts to another instance of ADF.
In this post:
- Development Environment Setup
- Deployment Workflow using ADF Utilities
- Preparation to Run ADF Utils
- Validate and Export Commands
- Deploy the ARM template
Development Environment Setup
For this exercise, my setup is:
-
ADF Development:
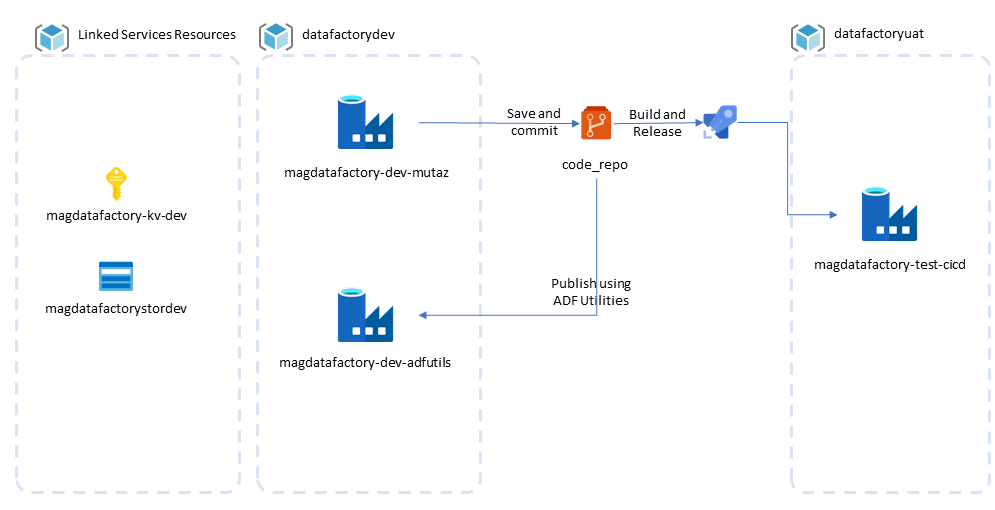
- dev-mutaz: developer/data engineer instance to build the ADF solution and its artifacts. ADF Portal is the tool of choice to visually author pipelines. This instance of the ADF service is integrated with a code repo, all changes are saved and committed to the code repo. Manual validation and publishing is required to promote changes and make them live in this ADF instance. -dev-adfutils: DevOps engineer instance to build and test process for generating ARM template files, custom parameters, pre/post and deployment scripts.
-
ADF Testing:
- test-cicd: Automated deployment instance, this resembles higher environments like test, pre-prod or prod environments. The subject of deploying to higher environments using CI/CD is covered in a following post.
The rest of this post is focused on preparing a local environment to run ADF Utilities using command line, this local setup can be used to for validating and exporting ARM templates, using custom parameters with ARM, and customising parameters definitions and unit testing pre/post and deployment scripts. This outcome of this step is then used to deploy an ADF solution to a new instance, dev-adfutils from local.
Deployment Workflow using ADF Utilities
In this process:
- Azure Data Factory Studio is used to build the solution in a dev instance
- Changes to ADF artifacts are automatically saved and committed to a Git repo collaboration branch (or feature branch)
- Code is pulled locally from feature branch and ADF Utils tool is run to validate ADF JSON artifacts
- ADF Utils export command is used to build ARM templates and the accompanying template parameters files
- Azure CLI is used to deploy the ARM template to a live instance of ADF
- Test that deployment customisation is correct

Preparation to Run ADF Utils
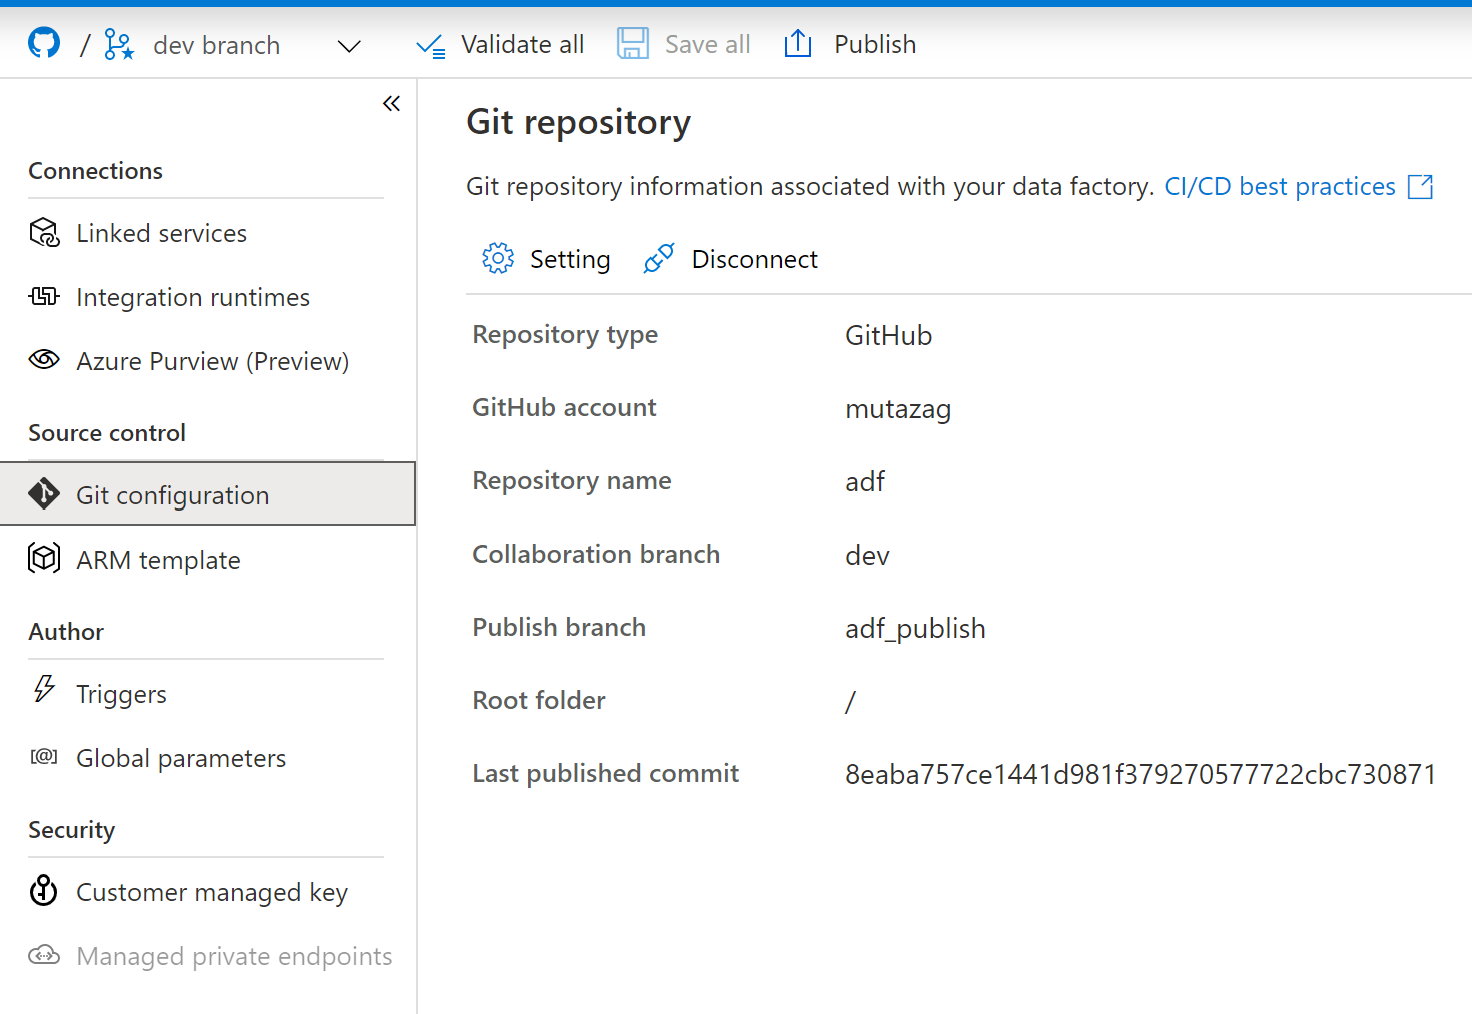
Git Integration
Ensure that the development instance of ADF is connected to a Git repo.
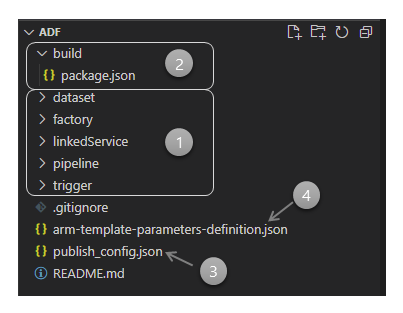
Folder Structure
Clone the feature branch locally and open it in VSCode.
| Item | Description |
|---|---|
| (1) | ADF code folder, as specified by root folder when setting up the git integration. |
| (2) | Build subfolder, manually created and contains the file package.json, this file is used to install ADF Utils. ARM templates and other build artifacts will be stored in this folder. |
| (3) | ADF publishing settings file. |
| (4) | ARM templates parameters definition file, more on this file later. |
Install ADF Utilities
To prepare for using ADF Utils, you will need to create the npm package file (package.json) to install the utilities. I suggest placing it inside a build subfolder, as indicated by number (2) in the previous screenshot.
package.json file:
{
    "scripts": {
        "build": "node node_modules/@microsoft/azure-data-factory-utilities/lib/index"
    },
    "dependencies": {
        "@microsoft/azure-data-factory-utilities": "^0.1.5"
    }
}
Install nodejs, if not already installed on the local development computer.
In the command line, or a nodejs console, run package installation command from the build folder:
npm install
The npm installation will create a folder named
node_modules, add this folder to the.gitignoreas you do not need to commit it to the source code repo.
Validate and Export Commands
The commands to validate ADF json solution artifacts and export corresponding ARM templates will process the source code from the local clone of the Git repo, you need to provide the details of the ADF dev instance so that these scripts can parse and process correctly, the following are values to update in the command lines later:
| Values | Description |
|---|---|
| Subscription ID | subscription id in which your dev instance is created |
| Resource Group Name | resource group name in which your dev instance is created |
| ADF Name | name of the ADF dev instance |
Validate Command
The validate command requires a publish_config.json file in the ADF code root folder, it specifies the name of the publishing branch for creating ARM templates when using the publish command in the UI.
{"publishBranch":"adf_publish"}
The command to validate the the ADF json code, similar to the validate all command in the ADF UI, is:
npm run build validate c:\git\adf /subscriptions/<Subscription ID>/resourceGroups/<Resource Group Name>/providers/Microsoft.DataFactory/factories/<ADF Name>
Export Command
The export command will process the ADF code files to generate corresponding ARM templates and parameters file. You need to run this command after validation is completed successfully.
npm run build export c:\git\adf /subscriptions/<Subscription ID>/resourceGroups/<Resource Group Name>/providers/Microsoft.DataFactory/factories/<ADF Name> "ArmTemplate"
The command create an output folder, ArmTemplate, with the following two key files: ‘ArmTemplateforFactory.json’ and ARMTemplateParamatersForFactory.json.
At this stage, you can make a copy of the ARMTemplateParamatersForFactory.json for environment specific parameter values. The template parameters file by default includes connection properties of linked services.
To further control parameters output file, we will look at the use of arm-template-parameters-definition.json later in the post.
Include Global Parameters in the ARM template
ADF global parameters can also be included in the ARM template parameters, you can achieve this by enabling the option to add global parameters to tha ARM template through ADF Portal UI.
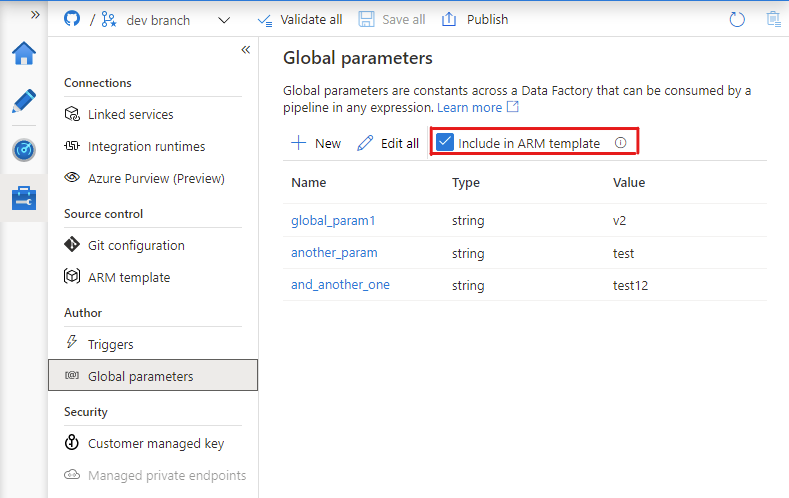
After making the change, ADF will add the option includeFactoryTemplate in publish_config.json file.
{"publishBranch":"adf_publish","includeFactoryTemplate":true}
Running the export command after enabling global parameters in the ARM template will inject global parameters in the ARM template parameters file.
{
    "$schema": "https://schema.management.azure.com/schemas/2015-01-01/deploymentParameters.json#",
    "contentVersion": "1.0.0.0",
    "parameters": {
        "factoryName": {
            "value": "magdatafactory-dev-mutaz"
        },
        "storagegen2_properties_typeProperties_url": {
            "value": "https://magdatafactorysotrage.dfs.core.windows.net"
        },
        "dataFactory_properties_globalParameters_global_param1_value": {
            "value": "v1"
        },
        "dataFactory_properties_globalParameters_another_param_value": {
            "value": "v1"
        },
        "dataFactory_properties_globalParameters_and_another_one_value": {
            "value": "v1"
        },
        "dataFactory_location": {
            "value": "australiaeast"
        }
    }
}
The names of parameters take on the full name of the property in the ARM template. For example, storagegen2_properties_typeProperties_url is the url property of the linked service storagegen2. Similarly for global parameters, dataFactory_properties_globalParameters_another_param_value is the paramaterised value for ADF global parameter another_param. These names can be shortened by using the ARM custom parameters definition template, which makes it easier when later on you need to write custom parameters files.
Deploy the ARM template
The result ARM template and paramaters can be deployed to an ADF instance, dev-adfutils in this example, using various methods, e.g:
- Deploy using Azure Portal: https://docs.microsoft.com/en-us/azure/azure-resource-manager/templates/deploy-portal
- Deploy using Cli: https://docs.microsoft.com/en-us/azure/azure-resource-manager/templates/deploy-cli
- Deploy using Azure pipelines: https://docs.microsoft.com/en-us/azure/azure-resource-manager/templates/deployment-tutorial-pipeline
To deploy the ARM template from local computer, you need first to install Azure CLI, update the deployment parameters file, in this case I created a copy with correct values named dev-adfutils.paramaters.json, and run the command az deployment group create command to deploy to Azure.
$rgname = 'datafactorydev'
$templatefile = '.\ArmTemplate\ARMTemplateForFactory.json'
$parameters = '@.\dev-adfutils.parameters.json'
$deploymentname = $('ExampleDeployment_'+$(Get-Date).tostring("yyyyMMdd.HHmmss"))
$subscriptionname = 'Azure MSDN 01'


echo $('switch subscription to ' + $subscriptionname)
az account set --subscription $subscriptionname
az account list --output table

echo $('create deployment '  + $deploymentname + ', in rg: ' + $rgname)
az deployment group create --name $deploymentname --resource-group $rgname --template-file $templatefile --parameters $parameters
Customising ARM Template Parameters Definition
There are cases where you want to override the parameters template, these include reducing the number of parameters in the deployment or parameter names. But there are also situations where you may need to parameterise a property that is not offered as a parameter by default, like for instance schedule properties of an ADF trigger.
The next post on Using the ADF Utilities Custom ARM Template Parameters Definition covers the options available through the use of arm-template-parameters-definition.json file in ADF Utils to achieve this granular level of customisation.
Comments